Caulking Log Siding Joints: How a Breckenridge Log Home Warped in Just One Year

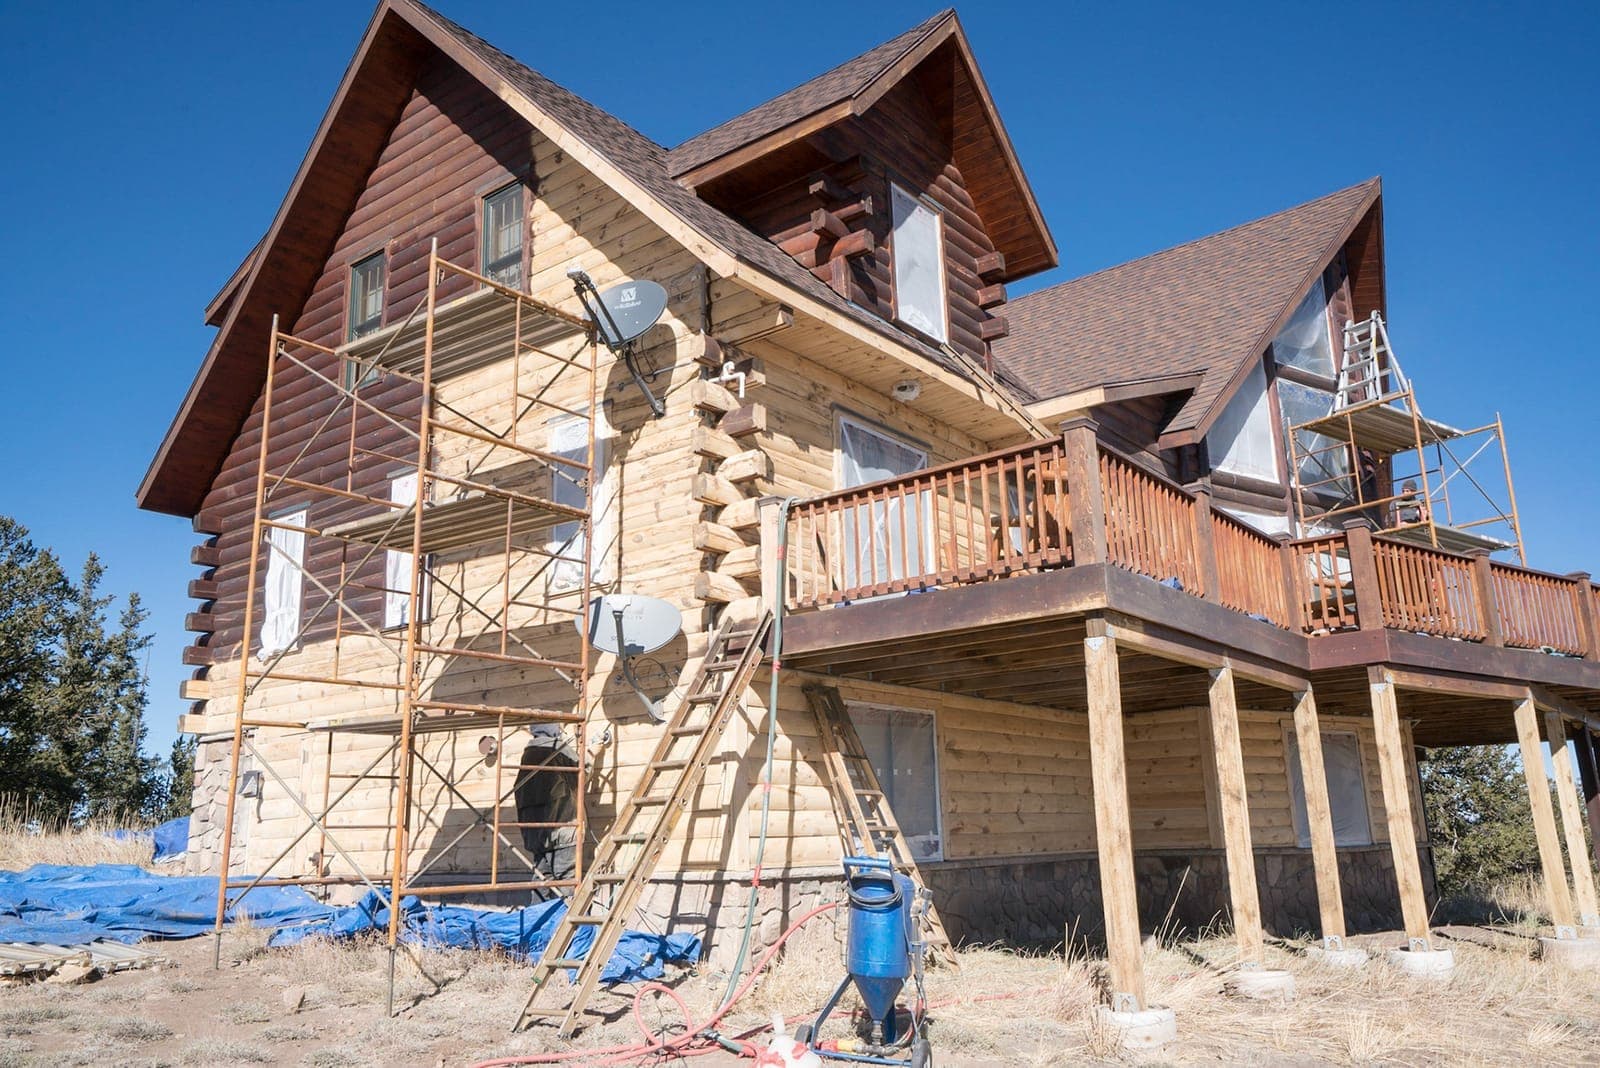
A log home should look better after a year of settling in, not worse. So when the exterior siding on a Breckenridge log home began cupping, warping, and cracking just twelve months after construction, the homeowner knew something was wrong. This was not the slow, expected weathering of a decades-old cabin. It was rapid, widespread distortion on a brand-new home — and it traced back to two avoidable shortcuts in how the siding was finished and installed.
The two culprits: the horizontal joints between the siding boards were never caulked, and the heavy-bodied stain was applied to only the exposed face of each board, leaving the back side bare. Together, those two conditions let water reach the one part of the wood that had no protection at all — and the siding paid the price. The photographs in this article are from the actual home.
The bottom line: Solid-wood log siding has to be sealed and balanced. When the stacking joints are left open and the boards are coated on one face only, the wood takes on and releases moisture unevenly — so it curls, cups, and checks. The fix is to seal every open joint and crack with a color-matched flexible caulk before water turns a cosmetic problem into a structural one.
A One-Year-Old Log Home That Was Already Failing
The home is clad in solid-wood horizontal lap log siding — individual boards that stack in continuous courses across each wall and return in shorter sections around the windows and sliding glass doors. It was finished in a dark grey, heavy-bodied stain that builds a film on the surface it is applied to.
On paper, that is a beautiful, durable finish. In practice, two details were missed during installation and finishing — and at high altitude in the Colorado mountains, where intense UV and brutal wet/dry cycling test every joint, those details are not optional. Within a single year, the most sun- and weather-exposed walls were visibly distorting.
What the Siding Looked Like After 12 Months
The damage concentrated exactly where you would expect the most weather exposure — the south and west elevations, which take the most sun and the most wind-driven rain and snowmelt. The symptoms were unmistakable:
- Cupping — individual boards curling away from the flat plane of the wall.
- Warping and waviness — entire courses of siding rippling instead of sitting flat.
- Checking — cracks splitting open through the stained face and exposing raw wood beneath.
- Widening joints — as boards cupped, they pulled the open horizontal reveals even wider, feeding the cycle.
From the Field: The Siding Conditions We Documented
The photographs below were taken on site at this Breckenridge home. Each one documents a specific failure mode — and every one traces back to the same two root causes: open, uncaulked joints and a one-sided finish. Here is what we found, and what each condition means for the wood.
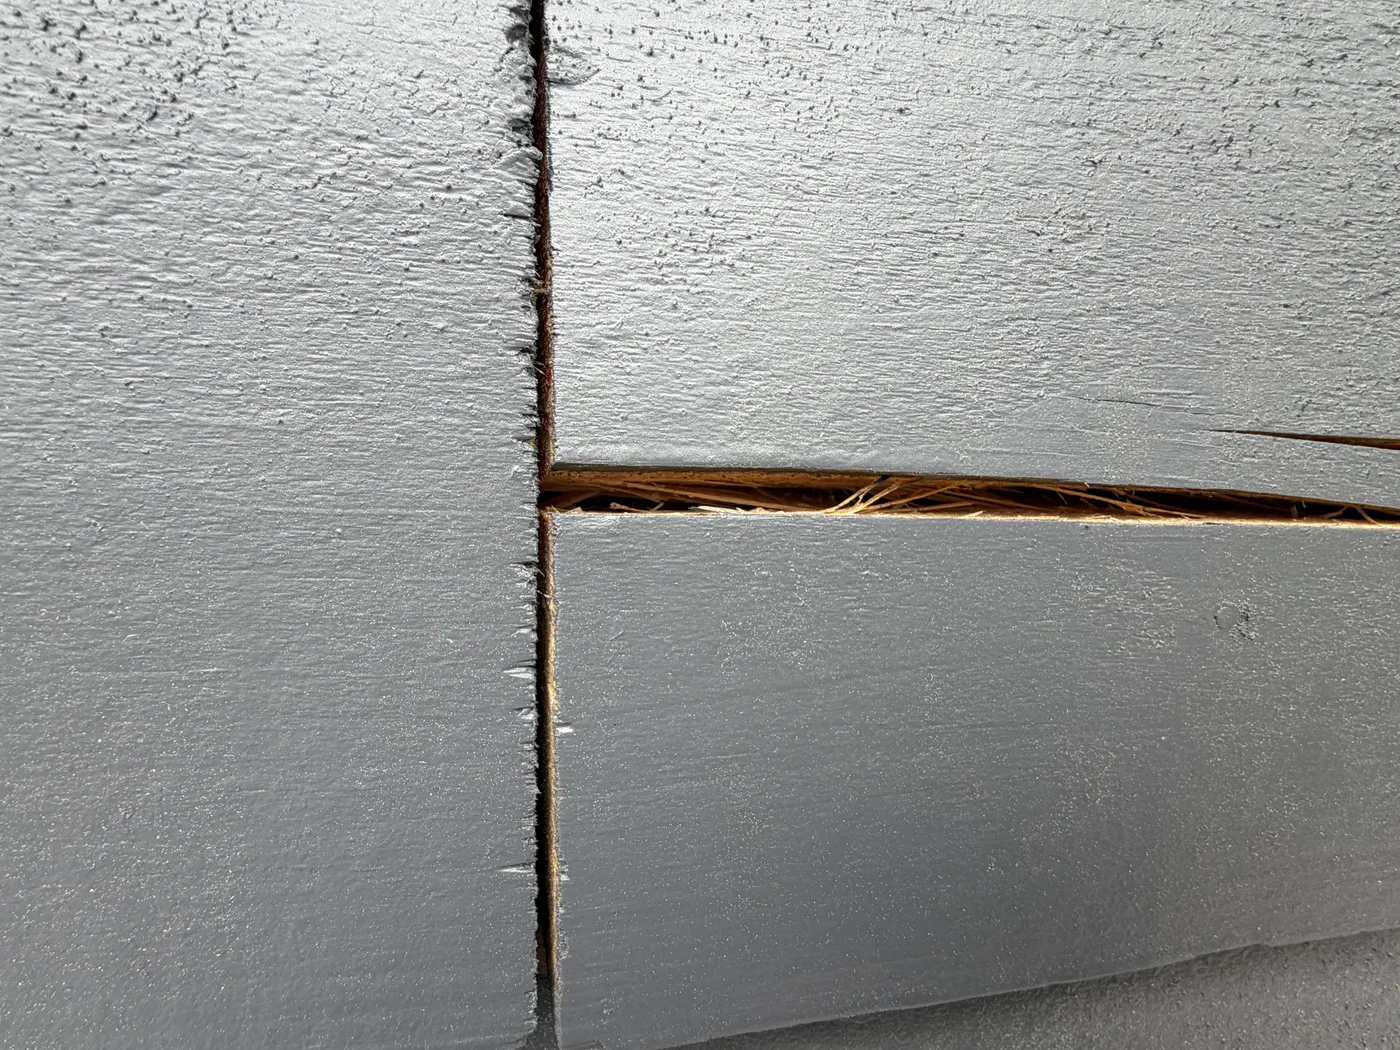
Annotation: The vertical butt joint where two boards meet was never caulked, and the open horizontal reveal below it is packed with pine needles. Trapped debris holds moisture directly against bare, unsealed end grain — a continuously damp path that wicks water behind the face of the siding.
 stain blistering and lifting on the board above the joint" style="width: 100%; max-width: 900px; display: block; margin: 0 auto; border-radius: 12px; box-shadow: 0 10px 30px rgba(0,0,0,0.12);" />
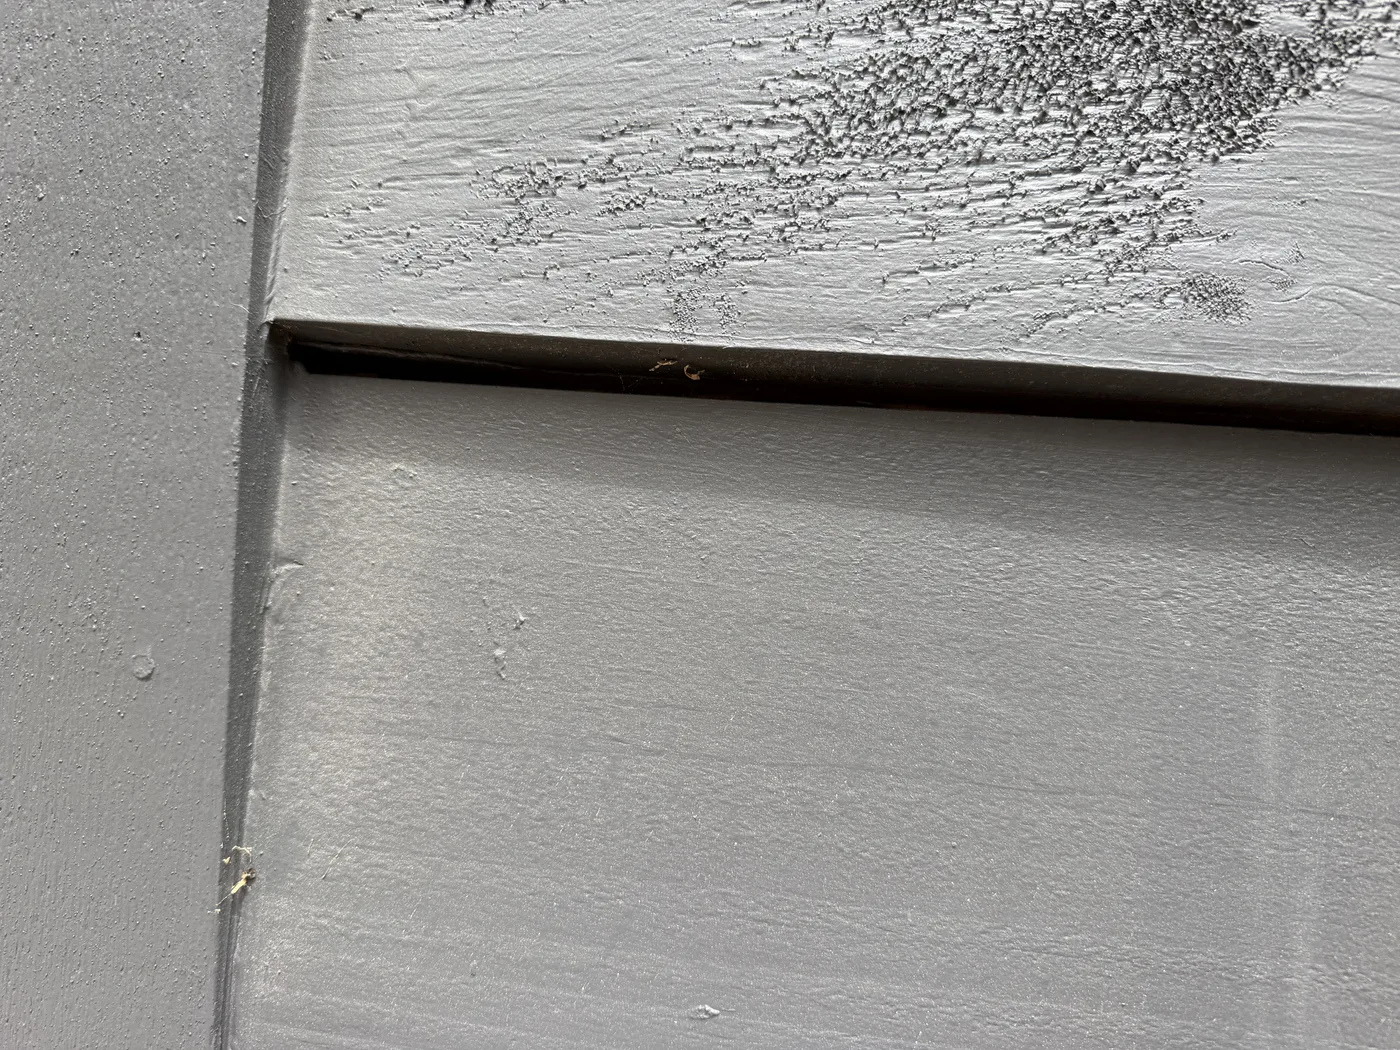
Annotation: A wide, unsealed horizontal reveal sits below a board whose heavy-bodied stain is blistering and lifting. With the back face left bare, moisture moves in through the open joint and pushes out through the film — breaking its bond from underneath. This is the signature of a one-sided finish, not ordinary wear.

Annotation: Long checks run along the grain and split straight out of the butt joint. As the one-sided board cupped and moved, the rigid stain film could not follow it and cracked open. Every check is a fresh, unprotected entry point that carries water into the core of the board.
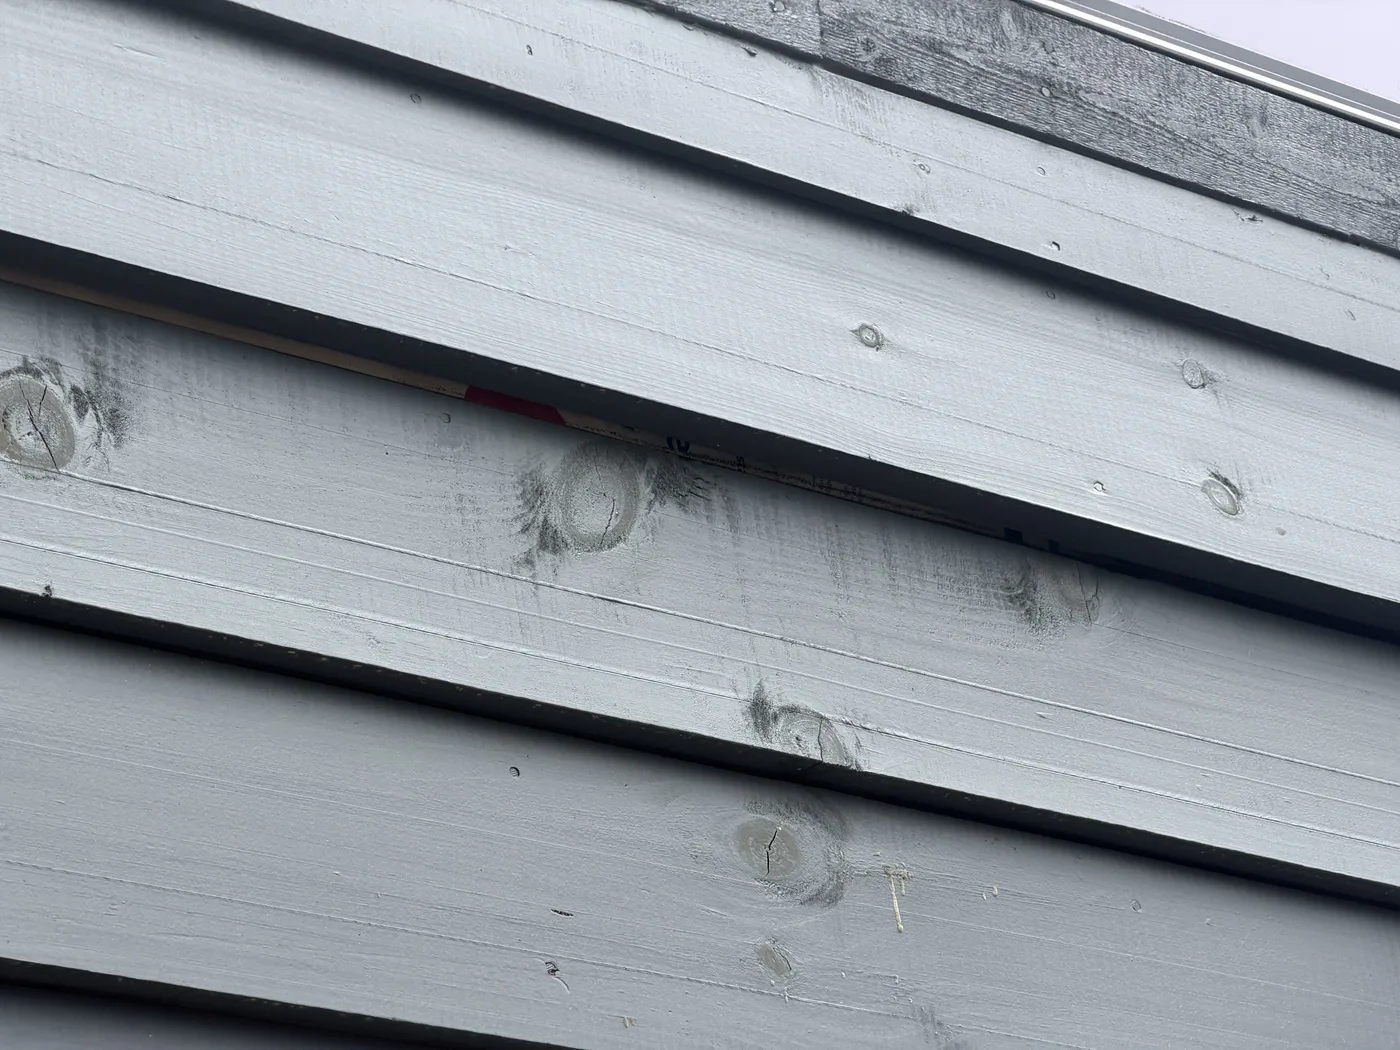
Annotation: Dark mildew and moisture staining gather around the knots and along the lower edges of the boards, right beside a lap that has opened far enough to expose the sheathing behind it. Persistent dampness from the unsealed joints feeds the mildew and discoloration — the surface evidence of wood that never gets a chance to dry out.
Three Problems Working Together
No single mistake causes this much movement this fast. On this home, three reinforcing conditions stacked on top of one another.
1. The Siding Joints Were Never Caulked
Where each course of log siding stacks on the course below, the joint forms a horizontal reveal. On this home that reveal was wide and, across the inspected walls, left completely open — never sealed with caulk. An open reveal of that size is a direct highway for wind-driven rain and snowmelt to travel behind the face of the siding, where it wicks straight into the bare back side and unsealed edges of the boards.
The vertical butt joints where two boards meet end-to-end showed the same thing: a gap exposing raw, unsealed wood fiber directly to the weather. A sealed joint keeps water on the outside face, where the stain can shed it. An open joint delivers water to the one part of the board with no protection at all.
2. The Stain Was Applied to Only One Side — The Root Cause
This is the underlying driver. The siding was finished with a heavy-bodied (film-forming) stain on its exposed weather face, while the back of each board — the side against the structure — carried no finish at all. A film on one face changes how that face exchanges moisture with the air. With the weather face sealed and the back face bare, the two sides of every board reach different moisture levels and respond differently to every wet/dry cycle.
The bare back swells and shrinks freely; the coated face resists. The board cups toward the more active side, and the stain film — bonded to wood that is now moving — gets stressed and begins to check. It is the predictable result of finishing solid-wood siding on one face only, not ordinary wear.
3. The Short Boards Around the Sliding Doors Took the Worst of It
The most severe cupping was on the short siding sections — roughly six feet long — that frame the sliding glass doors. A shorter board has less length over which to distribute the same moisture stress, so it distorts more easily. Those short pieces also have proportionally more cut end grain, and exposed end grain drinks up water faster than the face of a board — intensifying the imbalance exactly where the wood is least able to resist it.
The Wood Science: Why a One-Sided, Unsealed Board Cups
Wood is hygroscopic — it constantly absorbs and releases moisture as humidity changes. A finished board stays stable only when both faces gain and lose moisture at a similar rate. The moment one face is sealed and the other is left bare, that balance breaks. The bare face moves; the sealed face fights it; the board curls toward the wetter, more active side. Repeat that cycle through a Colorado mountain year of sun, snow, and freeze-thaw, and the result is cupping, warping, and checking — and every new crack becomes another doorway for water. Left unsealed, the condition is self-reinforcing.
Why Caulking Log Siding Joints Matters So Much
Caulking is not a cosmetic touch-up — on lap log siding it is part of the weatherproofing system. A properly sealed joint does two jobs: it keeps bulk water from getting behind the siding, and it keeps the back face and edges of each board dry enough to stay in balance with the finished face. That balance is what stops the cupping before it starts. This is the same sealing discipline behind professional log home chinking and caulking, and it works hand-in-hand with a correct log home staining system that protects all faces of the wood — not just the one you can see.
The Fix: Sealing the Joints and the Checks
The corrective measure is to seal the assembly against further water entry — caulking the open siding reveals and the checks (cracks) throughout the siding with a color-matched, flexible sealant blended as closely as possible to the existing grey finish. Sealing the reveals closes the path that lets water reach the bare back side; sealing the checks closes the new entry points that have opened through the stained face.
On a home this size, that scope ran to roughly 3,800 linear feet of sealant at about $6 per linear foot — a five-figure repair on a house barely a year old. One important honesty check: caulking arrests further water-driven movement, but it does not reverse cupping that is already locked into a distorted board. Where individual boards are too far gone to seal effectively, targeted board replacement and rot repair may be recommended on top of the sealing work.
Why it matters for your wallet: The sealing work needed here would have cost a fraction of that if the joints had simply been caulked during construction. Sealing is cheap. Replacing warped, checked siding is not.
How to Protect Your Own Log Home
Whether your log home is brand new or decades old, the same principles keep the siding flat and sound:
- Seal every joint, reveal, and check. Open horizontal reveals and butt joints should be caulked with a quality flexible sealant — not left to the weather.
- Finish all faces of the wood. Solid-wood siding should be stained or sealed on the back face and end grain before installation, so both sides exchange moisture evenly.
- Watch the south and west walls. They take the most punishment — inspect them first and most often for cupping, warping, and checking.
- Catch it early. A small open joint sealed today prevents a warped wall tomorrow. An annual log home inspection spots these problems while they are still cheap to fix.
If you own a log home in the high country, the same conditions that damaged this home are at work on yours. See a real anonymized example from this town on our Breckenridge log home inspection page, explore the full scope of log home restoration we provide, or learn more about the services we offer across Breckenridge and Summit County.
Worried About Your Log Siding?
Catching open joints and one-sided finish problems early is the difference between a quick caulking job and a full siding replacement. We inspect, seal, and restore log homes across the Colorado mountains.